If you want it “close to the metal” without installing a server OS now you can, you decide for yourself if it is a good idea
It is COMPLETELY unsupported by MS and should only be used for a local development/demo machine.
First, download SharePoint foundation 2013 with SP1 or SharePoint Server 2013 with SP1. If you need to apply a language pack, you can get them here. This setup requires you to be joined to a domain. You can also use local accounts.
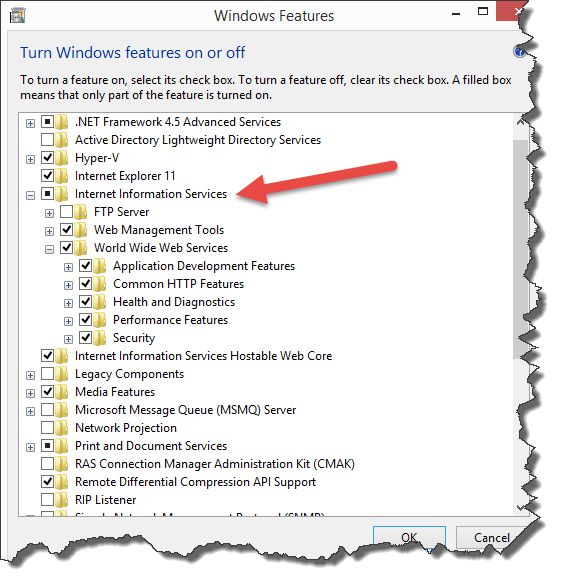
1. First make sure you have installed IIS on your machine; it isn’t installed by default. I’m installing pretty much everything except “good old” ASP.
Then make sure you have HTTP Activation installed (.NET Framework 4.5 Advanced Services/WCF Services).
If you are on Windows 8(1), make sure you have WIF installed. The standalone installer won’t run on Win8 you install WIF from “Turn Windows features on or off”.
Make sure that the Net. Tcp Listener Adapter service and Net. Tcp Port Sharing Service are both configured to start automatically.
2. Download the installer zip file from here.
3. Unzip the installer to your desktop.
4. Launch setup.exe.
This will install the “launcher” into your directory of choice.
5. Browse to the location where you just installed the software and start Launcher.exe.
6. When you start Launcher, it will open a “OpenFile” dialog allowing you to select the app to start. We first choose prerequisiteinstaller.exe to get all the prerequisites installed. (Try pick another locked down installer.)
7. Run through the prereq wizard and if you get a problem installing some of the components, try to reboot. There’s also a step when the wizard will reboot the machine. Remember that when the machine has rebooted, the wizard will automatically be launched by windows and you will see an error message saying “this OS is not supported”. Don’t worry, just close the wizard and relaunching using Launcher.exe as described above.
Once the wizard is complete you go to the next step and install SharePoint.
8. Restart Launcher.exe and pick setup.exe.
9. Follow the setup wizard.
10. Click close to run the configuration wizard.
11. The next screen warns us that we are installing on Vista or Windows 7. Don’t worry, the same applies to Windows 8/8.1 — unsupported in every way.
12. Create a new farm, wait, and have a snack.
13. We are finally done running a “private cloud”.
Please leave comments here that might help others through the installation.


