
From its very beginning Ubuntu has done things differently. it’s mounted one of the fiercest bids to get Linux into the mainstream desktop and few would doubt that the distro has brought Linux to the masses and given a popular and stable platform to a record number of spins.
Ubuntu remains the easiest mainstream Linux distribution for new users that are looking to migrate to an open source operating system. If you are shopping around for a laptop pre-installed with Linux, anywhere in the world, chances are the only option you’ll find is Ubuntu.
In this feature we’ll help you cut through the jargon (and the noise) and absorb the changes to enhance your day-to-day tasks, and show you how to install Ubuntu. Whether you are a seasoned campaigner or a new user, we’ve got you covered. We’ll hand-hold new users and equip you with the know-how to make room for the distro by partitioning your Windows installation.
Prepare to install Ubuntu
Before installing Ubuntu, you should familiarise yourself with a few important technical details that’ll help you troubleshoot any issues you may run into in the future.
When installing Ubuntu, the installer will ask you to select a filesystem for the Linux partition. Broadly speaking, a filesystem controls how the data on a disk is stored and retrieved.
Windows uses the NTFS filesystem, while Linux uses the ext filesystem; the latest being ext4. Ubuntu also needs a smaller swap partition to complement the physical RAM on your PC. A good rule of thumb is to create a swap partition that’s twice your RAM but only up to 2GB.
If you’ve got more RAM than 2GB just create swap partition that’s equivalent to the amount of RAM. Another term you’ll have to get friendly with is bootloader. This is a small program that tells the computer where to find the different operating systems on the disk.
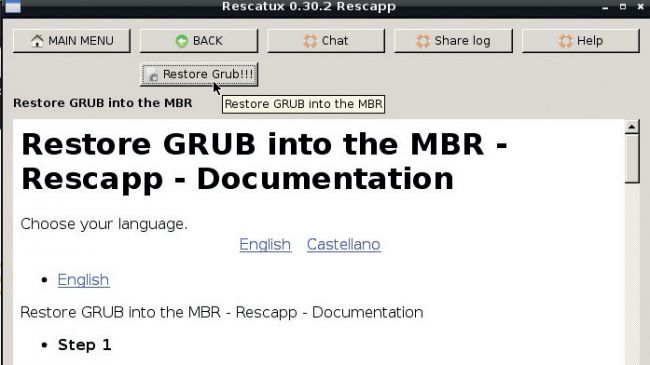
If a Windows update prevents you from booting into Ubuntu, use the Rescatux
Most Linux distros use the Grub 2 bootloader. Also, hard disks in Ubuntu aren’t labelled by a drive letter. Instead disks are labelled according to the device driver they are using. Typically hard disks use the mass storage driver, and thus have the sd prefix.
This prefix is followed by a letter to identify individual devices, so sda is the first hard disk. Individual partitions are identified by the number prefixed to the hard disk, so sda2 is the second partition on the first hard disk.
Linux distros are distributed as ISO images. These are specially crafted archive files of an optical disc and have the .iso extension. You can burn them to a CD or DVD, depending on their size, using the option to burn ISO images. A more efficient and cost-effective method to use ISO images is to transfer them to a USB drive.
On Windows you can use tools such as Unetbootin and Yumi that will create bootable USB drives with the ISO images of many popular distros including Ubuntu. You can then use these USB drives to install Ubuntu, and then reformat them for regular use.
Finally, before installing Ubuntu, make sure you turn off FastStartup from the Control Panel in Windows.
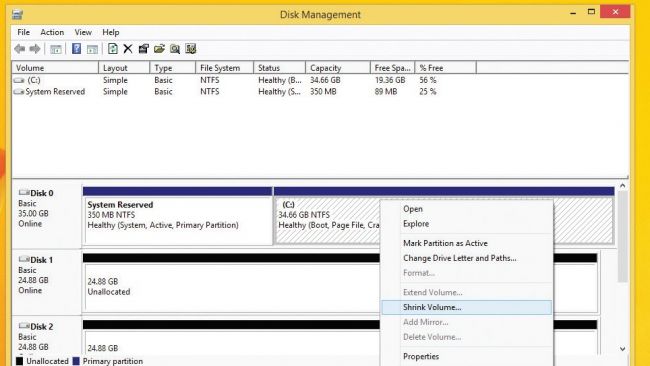
1. Make room
To create an empty partition for Ubuntu, you’ll first have to squeeze your existing Windows partition. Fire up the Disk Management tool in Windows, and right-click your main partition; typically assigned the drive letter C.
Then select the Shrink Volume option from the pop-up menu.
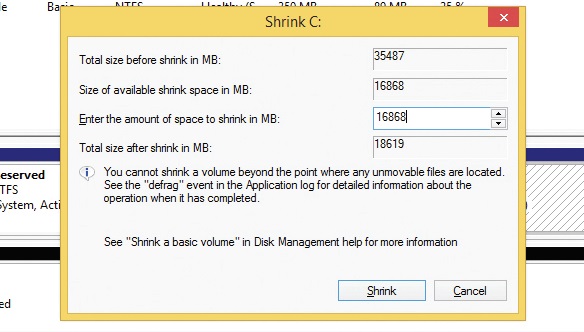
2. Shrink Windows
This brings up the Shrink dialog box, which shows you the maximum amount of space you can squeeze out of the partition. To create a new partition, specify the size of the partition in megabytes (MB) and click Shrink to start the process.
Ubuntu needs at least 5,000MB, but 20,000MB would be ideal.
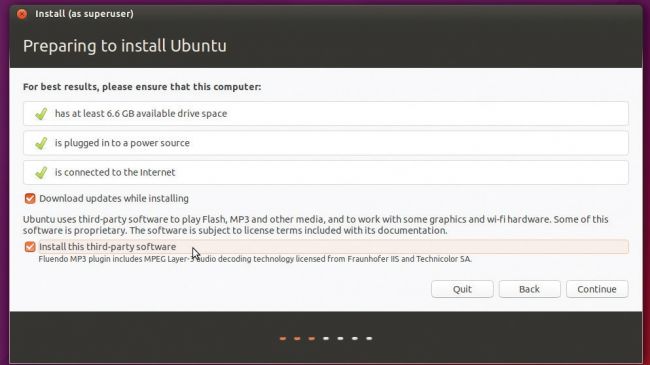
3. Updates & plugins
After your PC boots from the Ubuntu installation medium, it’ll display a checklist. Make sure you toggle the two available checkboxes on this screen.
The first will fetch any available updates from the internet, and the other will install the plugin required to play MP3 content.
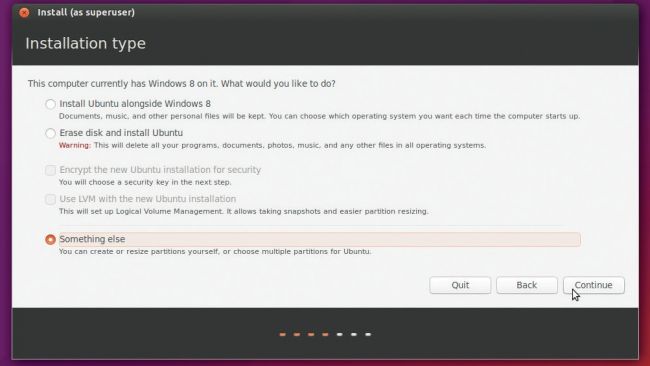
4. Use free space
In the screen labelled Installation type, toggle the ‘Something else’ radio button to manually partition the disk. Ubuntu will now show you a list of partitions on the disk.
Select the one labelled free space and click the + sign to create a partition out of the space you freed up in Windows.
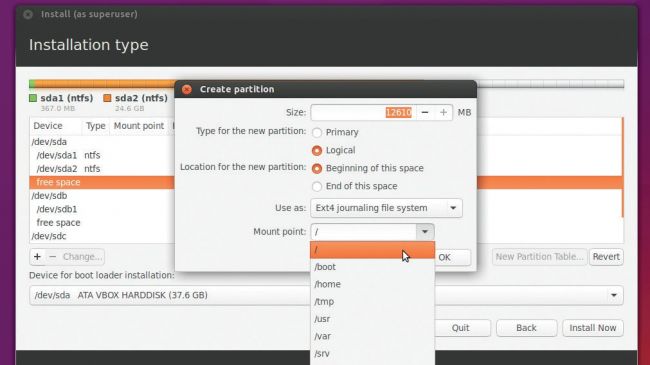
5. Define partitions
In the Create partition box enter the size for the Ubuntu partition leaving enough room for the swap partition. Then use the Mount point pull-down menu to select the / option.
Similarly create a partition for swap but instead of the default Ext4 option, select the swap area option.
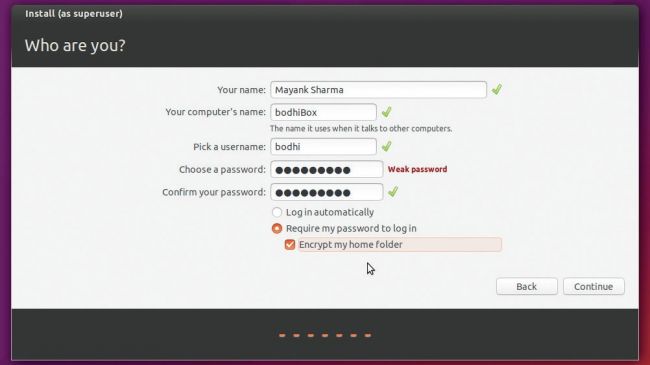
6. Login credentials
That’s it. The installer will now start installing Ubuntu. While the files are being copied to the disk in the background, it will ask you for your location and time zone, as well as your keyboard layout.
In the last screen you’ll be asked to enter your desired login and password details.
Source: http://www.techradar.com/


